February 21, 2013

Roasted Garlic Soup

Ahhhh, the time of year when everyone around seems to be sniffling and sneezing. Unfortunately, my husband is currently one of these people. In an attempt to take care of him without getting too close to catch his sickness I decided to use my garlic soup recipe to help him feel better. Since garlic is oh so tasty and a natural antibiotic it was a match made in heaven.

He was thankful for the steaming bowl of soup that cleared his sinuses and loved the soup as much as I did. This roasted garlic soup recipe is somewhat time consuming but is worth it in the end!


Every great soup starts with a great base. In this case homemade chicken stock. You can substitute store bought stock if you prefer but if you have the time and resources you should really make your own. You won't regret the extra effort. Especially when you warm the whole house with the savory aroma of roasted chicken and vegetables and taste the difference in the end product.

Homemade Chicken Stock
4 chicken thighs - bone in (very important)
6 cloves garlic
1 onion, sliced
4 large carrots, quartered
Salt and pepper

Preheat oven to 350 degrees F.

Add all ingredients to an appropriately sized roasting pan making sure fat side of chicken is up. Salt and pepper generously.


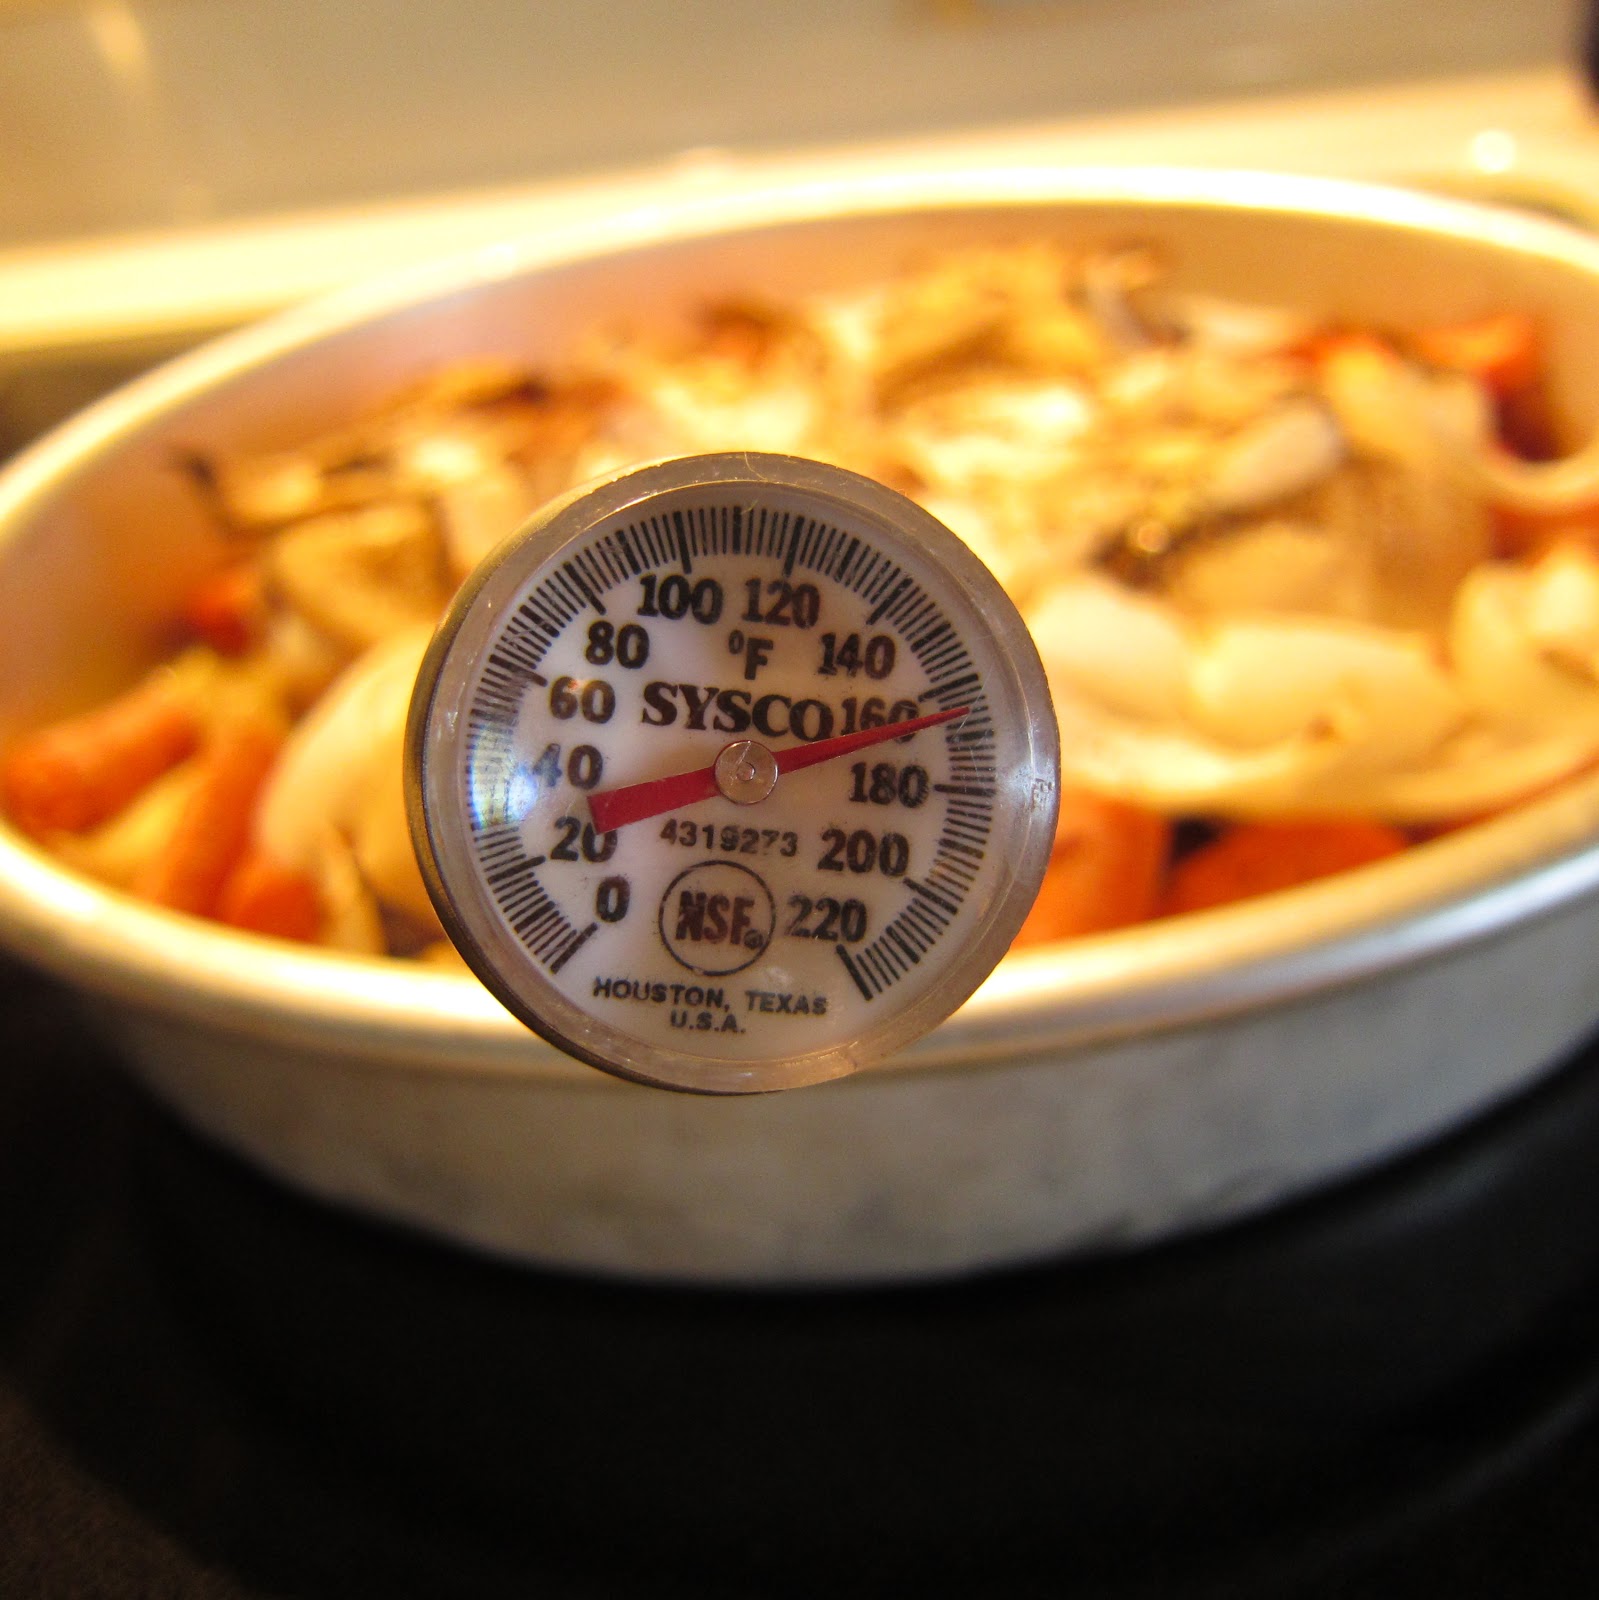
Bake 45-60 minutes or until chicken reaches 165 degrees F tested with a Safe Serve Meat Thermometer (Google Affiliate Ad).

Remove pan from oven and let chicken cool until you can pull all of the meat off the bone. Reserve for a later meal.

Add all chicken bones, fat and veggies to a large stock pot and fill with one quart of water. Bring to a boil, reduce heat, cover and simmer about 45 minutes.


Using a large fine mesh colander strain liquid into a large bowl and set aside.

Eat the carrots because you can't resist and discard the rest.

Keep oven preheated to 350 degrees F.

This is a really easy recipe for roasted garlic. Cut the top off of one head of garlic. Drizzle with olive oil and place in a Stoneware Garlic Roaster, White - White (Google Affiliate Ad). Roast 45-60 minutes or until garlic is tender. Let cool then squeeze out the garlic into a small bowl. Set aside.


Roasted Garlic Soup
1 head garlic, peeled and sliced
1 large onion, diced
2 T. olive oil
1 head roasted garlic
1 quart chicken stock
1/3 c. milk
1 small potato, peeled and diced
2 oz. cream cheese
2 T. butter
salt and pepper

Garnish - optional
scallions, thinly sliced
parmesan cheese, shredded
croutons

In a large soup pot sauté garlic and onion with olive oil until translucent over medium-high heat. Add in roasted garlic, chicken stock, milk, cream cheese and potato.

Bring to a boil. Reduce heat to a simmer and cover. Continue simmering 10-15 minutes or until potatoes are tender.

Using an immersion blender Cuisinart SmartStick Immersion Blender, Metallic Red (Google Affiliate Ad) blend the soup until smooth. Return to low heat. Add butter and salt and pepper to taste.


Serve hot and garnish with scallions, cheese and croutons if desired.

***If you love garlic and cook with it a lot you may want to consider a garlic press of some sort. It is very convenient and makes quick work of all that garlic! I don't roast garlic all that often but when I do I love to use my garlic roaster! It comes out perfect every time. Mine is ceramic but cast-iron works perfectly also! Both times are a great addition to a home kitchen!


February 19, 2013

Animal Cracker Cookies

I remember being allowed to eat traditional animal crackers twice as a kid. How sad, I know. When I received animal cracker cookie cutters as a Christmas gift I realized that my boys have never had animal crackers and I guess they still haven't. Instead I made them myself and enjoyed every minute of it!


I can't begin to explain my excitement when I first used the cookie cutters. They are plunger cutters and now I believe ALL cookie cutters should be plunger cutters. It makes it so easy. Even if there wasn't a design to imprint in the dough it would still be easier because you can plunge the dough right out of the cutter, if the dough sticks, and mine always seems to. Get some!

Animal Cracker Cookies
6 T. butter, softened
1/2 c. sugar
1/4 c. brown sugar
1 egg
1 t. vanilla extract
1 1/2 c. all-purpose flour
1/2 t. cinnamon
1/4 t. nutmeg

Preheat oven to 350 degrees F.

In the bowl of a stand mixer fitted with paddle attachment cream butter and sugars on medium speed. Add egg and vanilla mixing well.

Sift in flour and spices and mix until well incorporated adding more flour if necessary to make a firm dough. Wrap dough in plastic wrap and chill for about 1 hour.

Remove dough from the plastic wrap and roll dough on a lightly floured work surface until 1/4 inch thick. Using cookie cutters cut out animal shapes. Transfer cut-outs to a parchment lined baking sheet. Arrange cut-outs close together. The dough will not spread or rise much with this recipe. Sprinkle with turbinado sugar if desired and if leaving the cookies un-frosted.

 
Bake approximately 6-8 minutes or until edges are lightly browned.

Transfer to a cooling rack and frost if desired.

Unfortunately, I did not write down the recipe I used for the frosting but it was basically a thin buttercream frosting that I let set up on the cookies without covering for about 2 hours.

February 18, 2013

Dark Chocolate Cocoa Cookies

Soft + Chewy = Delicious! 
A perfect cookie choice to make with the kiddos. You absolutely can't go wrong with these chocolate cookies. The kids love rolling the cookie dough in sugar and tasting some along the way!

For an added punch try adding some instant coffee grounds for a more grown-up taste.


Dark Chocolate Cocoa Cookies
1 c. whole wheat pastry flour
1/3 c. unsweetened dark cocoa powder
1/2 t. baking soda
pinch of salt
6 T. butter, softened
1 c. sugar, plus extra for rolling
1 egg
2 t. vanilla
1/2 t. instant coffee grounds (optional)

Preheat oven to 350 degrees F.

In a small mixing bowl combine flour, cocoa, baking soda and salt. Set aside.

In the bowl of a stand mixer fitted with paddle attachment cream butter and sugar. Add egg and vanilla (and coffee grounds if using) mixing well. Add dry ingredients a little at a time mixing well between each addition. Dough will be firm.

Using a one inch cookie scoop form dough into balls. Roll dough balls in sugar, place on a silpat lined baking sheet and flatten slightly.

Bake 8-10 minutes. Immediately transfer cookies to a cooling rack.

Eat and enjoy!

February 13, 2013

Toy Print Dish Towels

Handmade gifts are especially fantastic but when children make them they seem that much more special and precious.

My boys really love to make gifts for birthdays and other holidays. After they make something they are so excited to give the gift and so proud when the recipient opens it. They get to tell their story of the process and what exactly they made.


I have done nature printing (using leaves, sticks, rocks, etc.) with my boys before that they enjoyed but since the weather was not cooperating this time around I had to come up with an indoor craft. As I searched around the house and through toy bins the boys watched with much interest. I didn't tell them what the project was but they already wanted to do it since I was collecting toys and they saw I had out paint!

I came up with the idea of printing dish towels with toys for their Grandmother's approaching birthday. I know she will love them as much as the boys loved making them.

This is a simple and easy project for kids of all ages.

Instructions:
Gather supplies and toys. Pick toys that will stamp with clean lines and basic shapes.

You will need the following items:
- New, unused dish towels
- Fabric paint
- Paint brushes
- Paper plates
- Toys - I gathered trucks with bulky tires, play-doh cans, plastic screws and nails, dice, legos (large and small) car wheels, tinker toys, etc.


When you unfold the dish towels you will see they are very wrinkled so you will want to iron them flat. Once towels are ironed tape them (I used packing tape) to a large work surface so they don't slip around when the kids are making their prints.

Squeeze a small amount of fabric paint onto a paper plate. Using a paint brush spread the paint out into a thin layer. When doing this project with small children I suggest using just one color. If you want to use more than one color try doing a first round and letting it dry and then add the second color after it dries so colors don't smear.


Let the child pick a toy and dip it in the paint and start stamping on the dish cloth. Reapply and thin paint on the paper plate as necessary.

A painting smock or an old shirt is a good idea so clothing does not get ruined. Let the kids do as little or as much stamping/printing as they want. Do not suggest or guide the children as to what patterns or designs to make. They are creating a one-of-a-kind gift. They will have fun and be very proud of themselves. This helps build their self esteem and what could be better than that?!


Let the paint dry before moving the towels from the table. Follow instructions on the paint bottle as to when you can wash the fabric.

Soak the toys in a bowl of soap and water and let them sit for a few minutes before you wash them. This fabric paint was easy to get off of the less detailed toys but harder to get off of the detailed toys like the car wheels and legos.


Here are the completed patterned and stamped towels ready to be given as a gift. My five year old made the red print. He said it is a praying mantis! My three year old made a random pattern black print.

February 6, 2013

Homemade Candy (Conversation) Hearts

I always looked forward to getting those tiny boxes filled with candy hearts for Valentine's Day. I distinctly remember the chalky hard texture that made them so enjoyable.

Making candy hearts turned out to be much easier than I had anticipated. If you have ever worked with or made fondant it is a very similar texture but dries much faster. I was amazed that the flavor and texture was almost identical to the store bought candy hearts. I made my hearts a little bigger than the real thing to save some sanity and time! They are each about the size of a quarter.

They do take some patience as they have to dry for 48 hours!


Candy Heart Recipe - adapted from bravetart.com
3/4 t. Powdered Gelatin
1/4 c. Clear Soda, of your choice
3 c. Powdered Sugar 
Food Coloring
Flavored Extracts

In a small mixing bowl dissolve gelatin in soda. After about 5 minutes, set the bowl over a pot of simmering water to melt the gelatin completely - until you can't see any granules.

Use a hand or stand mixer and mix in the powdered sugar 1/2 cup at a time. Keep adding the powdered sugar until you have stiff fondant-like dough. It will be somewhat sticky.


Turn the dough out onto the counter top and knead until smooth adding more powdered sugar if necessary. Divide dough into as many portions as you would like colors/flavors.

Make a sort of bowl shape out of one of the pieces of dough. Pour in flavored extracts and add food coloring. I made my candy hearts peppermint-vanilla (light pink and dark pink hearts) and vanilla bean (white hearts). Knead in the colors and flavors until well combined. Taste a piece of dough and add more extract if there is not enough. :)


Roll the dough to about 1/4” thickness and cut out shapes using small cookie cutters.

**I like to use square wooden dowels as guides for my rolling pin to make sure the thickness is the same throughout. This will make drying even amongst all of the candy hearts.

Arrange the candies on a parchment lined baking sheet and let dry for 48 hours. I know this is a long time but it takes that long to get them hard. Flip the hearts over occasionally to assure even drying on both sides.


Once the hearts are completely dry you can stamp them with what ever message you would like.  If the hearts are two-tones they are not dry yet.

Using a clean and new paint brush spread a thin layer of food coloring onto a small saucer. Press small, clean and new letter stamps into the food coloring and stamp onto the hearts! Repeat until you have stamped all the messages you want. Let the food coloring dry before eating to avoid red lips and tongue!! :P

February 5, 2013

Cheese Ball Checkers

This is 'cheese ball' in two ways: It's NERDY, of course, and it has the cheesy deliciousness of cheese ball!
I have recently started teaching my son how to play checkers on my computer. Since I don't have an actual game board I thought I would make one that we could eat as a fun and tasty snack! I figured it would definitely be a memorable experience and he might remember the rules of the game better this way.

He's five....and learning quickly but loved, loved, loved being able to eat the 'checkers' after he jumped mine. Of course the rest of the family jumped in after a few moves to munch the 'checkers' and the game board too! It would be a fun appetizer for a party since one can't really disappoint with cheese ball!

You will need the following to make cheese ball checkers yourself:
- cheese ball - recipe follows
- olives - green and black (kalamata)
- triskets or other square crackers
- pumpernickel bread
- toothpicks
- large surface for the playing board


Cheese Ball
8 oz cream cheese, softened
1/4 c. sour cream
1/4 medium onion, finely chopped
1/4 red bell pepper, finely chopped
4-6 thin slices hard salami, diced
1/2 c. shredded cheddar cheese
1/2 c. finely chopped walnuts
1/2 c. finely chopped chives

-16 green olives and 16 black olives - you will only need 12 of each for the 'checkers' but you will need a few extra in case you get 'kinged'. Then you can add an extra olive to the top of the toothpick!
-toothpicks

In a medium mixing bowl combine cream cheese, sour cream, onion, bell pepper, salami and cheddar until ingredients are well incorporated. Refrigerate 20 minutes.

Once mixture is cold (and slightly firmer) cut into 24 equal sized pieces and roll into balls.


Roll 12 of the balls in chopped walnuts and top with a green olive securing with a toothpick. Roll the other 12 balls in chopped chives and top with a black olive securing with a toothpick. Refrigerate until assembly time.


You don't have to use Trisket crackers and pumpernickel bread (I bought the pre-sliced cocktail bread) for the board but if you don't try and get items of contrasting colors and something that will taste great with cheese ball. The bread slices were larger than the crackers so I used a cracker as a pattern and cut the bread slices to be the same size.

Since a checker board is 8 squares by 8 squares you will need 32 crackers and 32 pieces of bread.

I used a large cutting board to assemble my checker board to make it easy to move but any sort of flat platter or board should work fine. Start with the first row and place every other one, bread, cracker, bread, cracker, etc. The next row would then start with cracker, bread, cracker, bread, etc. Making the classic checker board pattern. Continue until you have an 8 by 8 square.


Retrieve cheese ball bites from the fridge and place only on the first three rows of each side of the board and only on either the crackers or the bread to set up the game. You decide.

Youngest player goes first, of course, and so begins the game! If you don't know the rules of the game of checkers you can google it to quickly learn. I assume most people know how to play the game or maybe I am just getting old!! :)

Again, if you get 'kinged' add an extra olive.